Support family coding workshops in Gloucestershire: paypal.me/cotswoldjam
Update: I've also written an article explaining how to control the GPIO pins of a real Raspberry Pi Zero, from your Raspbian x86 virtual machine.
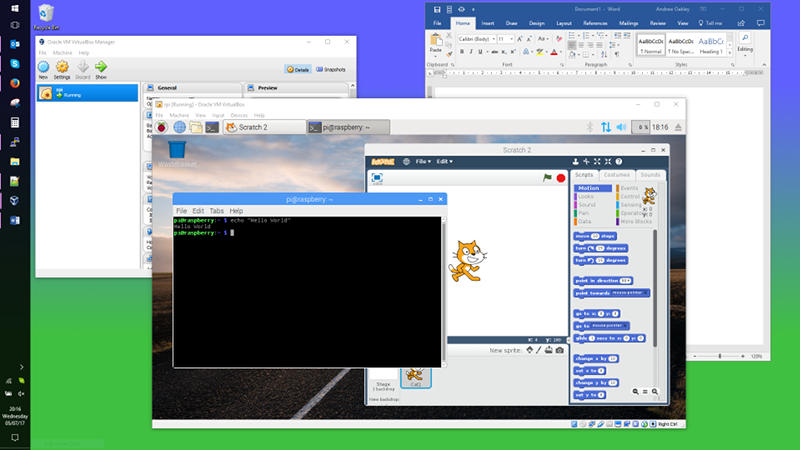
Oracle's VirtualBox is a user-friendly way of installing a virtual machine on a PC. In short, you can run a computer inside your computer - for example, the Raspberry Pi desktop inside your Microsoft Windows desktop. There are lots of other products that also do this, but VirutalBox is one of the easiest to use.
I find this useful for when I'm travelling and want to work on Raspberry Pi projects. I do usually pack at least one real Pi, but having it all on my laptop is a huge convenience.
I've also written an article explaining how to control the GPIO pins of a real Raspberry Pi Zero, from your Raspbian x86 virtual machine.
If you just want to do Raspbian desktop or terminal work, though, this is just the job.
I tried this using Microsoft Windows 10; it'll probably work with Windows 7 and 8 too. You can also do this on a Mac or Linux PC; if you're using one of those, the installation of VirtualBox may be different, but the setup should be mostly the same.
Just about any PC with 4GB RAM and a dual-core processor will do, but you'll get best performance if your processor has Intel's VT-X or AMD's V technology. If you don't have this, or don't know how to check, don't worry about it. If you don't intend to do much else with your PC, you could get away with as little as 2GB RAM.
You'll need to download:
Install VirtualBox just like any other Windows program; find the file you downloaded, and double-click it. Alternatively you may find it in your browser's Download area and there may be an "open in folder" or "launch" button.
 Run VirtualBox and click the New icon, then enter:
Name: Whatever you like. Keep it short. I suggest rpi or raspberrypi.
Type: Linux
Version: Other Linux (32-bit)
Click Next
Memory size: 1024MB
Click Next
Hard disk
Select Create a virtual hard disk now
Click Create
Select VDI (the default)
Click Next
Select Dynamically allocated (the default)
Click Next
Select 8GB
Click Create
 You'll now see your machine in the VirtualBox window, with "Powered Off". You now need to attach the Raspbian x86 ISO file to the imaginary CD-ROM drive.
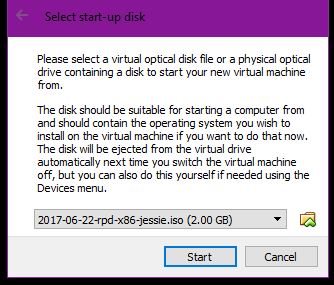
Select your machine and click the Start icon. You will shortly see "Select start-up disk". You should select the Raspbian x86 .ISO file that you downloaded earlier, and click the Start button.
 Use the up and down keyboard keys to select Graphical Install then press the Enter key. After a moment, you'll see a list of languages; select yours, then click Continue.
It'll buzz through a bit of setup (Loading additional components). Give it a couple of minutes.
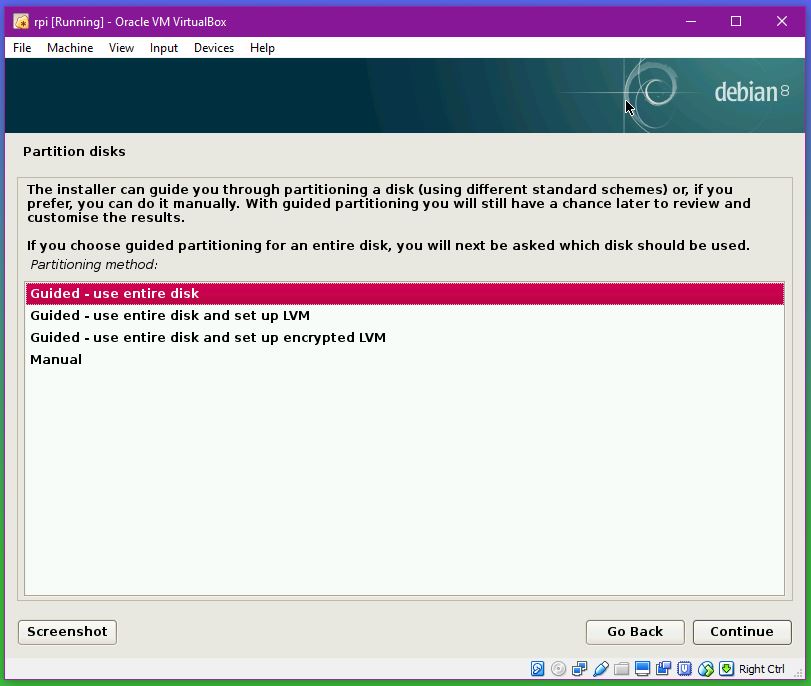 Next you'll decide how to use the pretend hard drive. For convenience, I suggest you leave it at "Guided - use entire disk" (the default) and click Continue. It'll show the one and only virtual hard drive; click Continue again.
Now it'll ask you about partitions; again for convenience, leave it at "All files in one partition" (the default) and click Continue. You should now see "Finish partitioning and write changes to disk" highlighted; just click Continue.
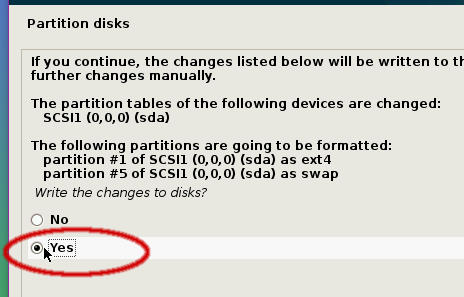 Finally for the partitioning, it'll ask you "Write the changes to disks?".
You need to select the "Yes" radio button then click Continue.
(If you leave it at "No", you'll just go back a step; click Continue and you'll carry on again.)
Now "Installing the System"; it'll install the Raspbian files on the virtual hard drive. This is the bit that can take a while. Assuming you selected "British English" as your language, you should now make a cup of tea. Otherwise you can go and eat some grits, whatever they are.
 Eventually (3-10 minutes or so), you'll be asked "Install the GRUB boot loader to the master boot record?"
Make sure "Yes" is selected (the default) and click Continue.
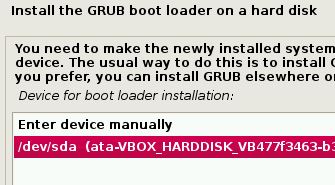
Now you need to select /dev/sda and click Continue.
(If you accidentally click "Enter device manually" then just click Go Back and repeat the last couple of steps.)
Good news! "Installation Complete". It tells you a load of guff about removing the CD-ROM, but you don't need to worry about that, just click Continue.
It does a bit of cleanup, then reboots.
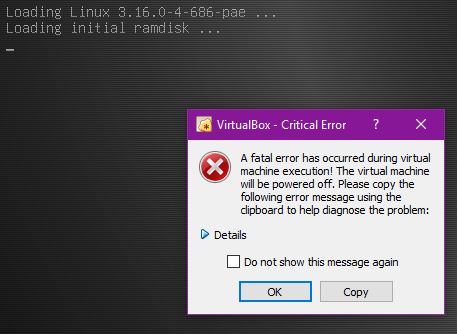 You'll then see the Debian GRUB screen, which is a bit whirly, and then a couple of seconds later you'll see something that looks really worrying, but actually isn't.
"A fatal error has occurred" - just click OK. We need to change one setting - simple!
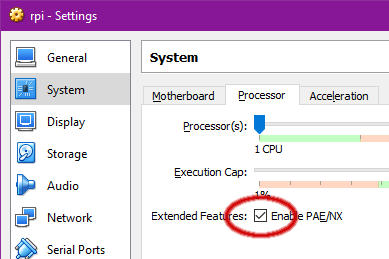 Click the Settings icon, System (on the side bar), Processor (on the tab, top middle) and tick Extended Features - Enable PAE/NX. Then click OK. Thankfully you only need to do this once; it should be remembered for all future times.
Now click Start. You'll see the VirutalBox startup screen, the swirly GRUB screen, then the Raspbian desktop will start to load.
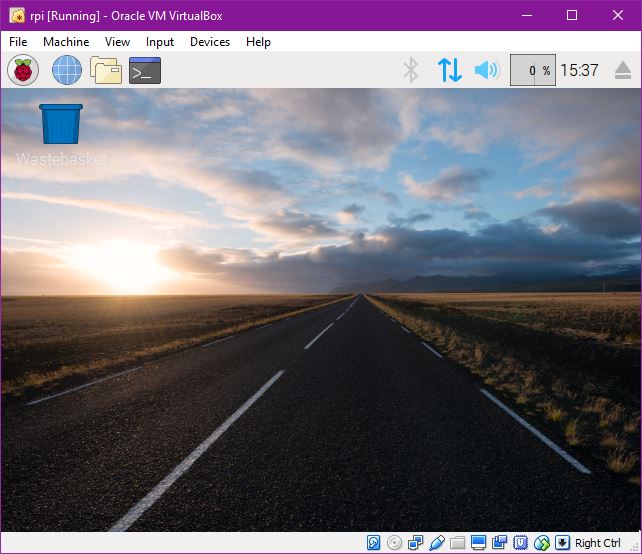 You can now use the Raspbian PIXEL desktop! But it's a bit smalll and cramped - 640x480 size. Also, you can't copy and paste between the virtual Pi and the real Windows desktop. Let's sort out those niggles.
Raspbian x86 will mostly work out-of-the-box with VirtualBox. However you can make it even better by installing VirtualBox Guest Extensions to the virtual Raspberry Pi, which lets the virtual Pi know that it's not real and that it exists inside another computer. This will allow you to resize the desktop, and enable copy & paste.
Click the Raspberry logo on the task bar - Accessories - Terminal.
In Raspbian Stretch (late 2017 onwards), the VirtualBox Guest Extensions are no longer in the standard Raspbian repositories. You need to enable the Debian Backports repsitory. To do this, you will also need to install the Debian authentication keys. Type in the following. Press Enter at the end of each line.
sudo apt update
sudo apt install -y dirmngr
sudo apt-key adv --keyserver keyserver.ubuntu.com --recv-key 8B48AD6246925553
sudo apt-key adv --keyserver keyserver.ubuntu.com --recv-key 7638D0442B90D010
sudo mkdir -p /etc/apt/sources.list.d
echo "deb http://ftp.debian.org/debian stretch-backports main contrib non-free" \
| sudo tee -a /etc/apt/sources.list.d/backports.list
sudo chmod 644 /etc/apt/sources.list.d/backports.list
Alternatively, if you still can't get the Guest Extensions from any repository, you can follow this guide by Andy Barnes to install Debian Stretch VirtualBox Guest Additions. Note that Andy's method requires compiling code from source, which might take a while depending on how powerful your host PC is. Once you've completed Andy's method, you can skip the apt update / apt install instructions in the next section, but you'll still need to reboot your virtual machine with sudo shutdown -r now
Type the following into the terminal. Press Enter at the end of each line.
sudo apt update
sudo apt install virtualbox-guest-dkms virtualbox-guest-x11 linux-headers-$(uname -r)
sudo shutdown -r now
Those brackets are the ordinary brackets, not the curly nor square ones. If only you could copy and paste it, rather than having to type it in... (you could enable SSH, but let's not go there now).
When prompted "Do you want to continue?", press the Y key and press Enter. It'll take a little while to download and install the extensions.
 (Did you notice how the virtual Pi inherited your real PC's internet connection? Neat, isn't it?)
The virtual Pi will reboot after the shutdown command.
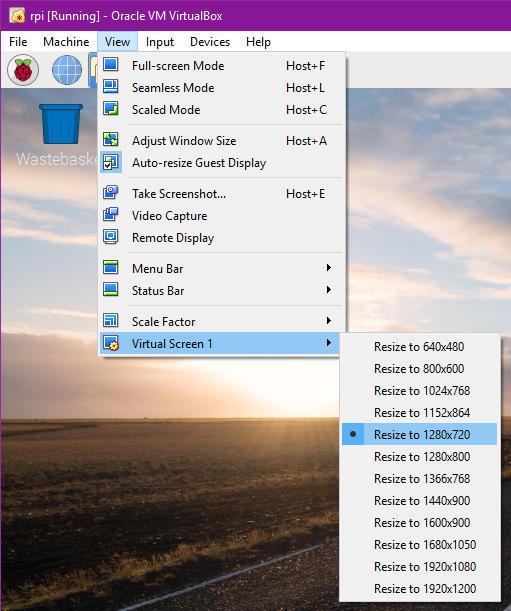
You can now resize the window to whatever screen size you like. You can also set a defined size, such as 1280x720 or 1920x1080, by going to VirtualBox's View - Virtual Screen 1 - Resize to (whatever you fancy).
If the Raspberry Pi desktop does not automatically resize to fill the new windows size, use VirtualBox's View - Auto-resize Guest Display menu to fix this. You may need to click a running program for the virtual Pi to notice the change and resize the task bar.
By default, this is turned off in VirtualBox. Once you have the virtualbox-guest extensions installed, then you can use VirtualBox's Devices - Shared Clipboard - Bidirectional menu to enable copy and paste between the virtual Pi and your real PC.
You can also enable the clipboard through VirtualBox Settings icon - Advanced - Shared Clipboard - Bidirectional. You'll still need Guest Extensions installed, though.
You can shut down your virtual Pi gracefully by doing any one of the following:
This is optional.
With Guest Extentions installed, you can share folders between the host PC and Raspbian guest; i.e. you can make a folder on your real PC available inside the virtual Pi. You'll need to add the pi user to the vboxsf group as per Peter WA Wood's instructions (thanks, Peter - Peter WA Wood's website is full of various interesting Linux, BSD, *nix and MacOS articles, take a look). Go to the terminal on your virtual Pi and enter:
sudo adduser pi vboxsf
or, if you prefer: sudo usermod -a -G vboxsf pi
You will need to completely log out and back in again to pick up this change; you may find a reboot easiest:
sudo shutdown -r now
You can then share folders from Virtual Box using Settings - Shared Folders and click on the folder add icon. Folders will appear under /media with the prefix: sf_
There are a few things that Raspbian x86 doesn't have, that it would have if it were running on a real Raspberry Pi:
Minecraft and Wolfram are, I suspect, licencing issues. The GPIO ports are a physical vs. virtual thing, but the Sense HAT Emulator (in the Programming menu) seems to work for Python programs.
Also bear in mind that you're just running the Raspberry Pi PIXEL Desktop and Raspbian Linux for Intel architecture - you're not emulating the ARM processor of real a Raspberry Pi. So you can't copy over binary executables from a real Raspberry Pi and expect them to work - they won't. However, source code and scripts such as Python, Scratch and Bash will work, as will anything that you install using apt from the repository (because some very nice volunteers have recompiled almost everything in the Raspbian repository for both ARM and Intel architecture).
If you need these features, you could always just get a real Raspberry Pi, and then use VNC to connect to the Raspberry Pi desktop over the network or SSH.
This bit's for advanced users.
Show how to get SSH working in VirtualBox using virtual forwarded ports
If you found this article useful, please make a donation - however small - to Cotswold Jam, the family-friendly coding & electronics club that I run in Gloucestershire. We run entirely on donations, we don't claim tax relief nor taxpayer-funded grants, and in addition to running four workshops for 60 children five times a year, we try to give away GPIO electronics kits. All cards are accepted and you don't need a PayPal account. paypal.me/cotswoldjam
Comments, errors and corrections to: andrew@aoakley.com
Public Domain - Andrew Oakley - 2017-07-04